How to Install Crystal Chandeliers
IMPORTANT: Prior to installation, consult with your home’s constructor or installer to verify your ceiling’s ability to bear the chandelier’s weight. Unless you are a certified electrician, you will need to employ one to manage the electrical aspects of the installation.
Once the foundation is set up and the electrical wiring is linked, the task of suspending the crystal strands should be relatively simple. While it requires a bit of time and patience, it’s completely manageable on your own. Alternatively, you may opt to hire a handyman to do the job for you at a significantly lower hourly rate compared to a professional electrician.
STEP 1: Preparation
Confirm that you have all the necessary components for the product as per the guidelines before you commence the installation process of the chandelier. Further, we advise you to have the electrician inspect the chandelier while it’s still on the ground prior to mounting it on the ceiling, to guarantee there has been no harm during transit.
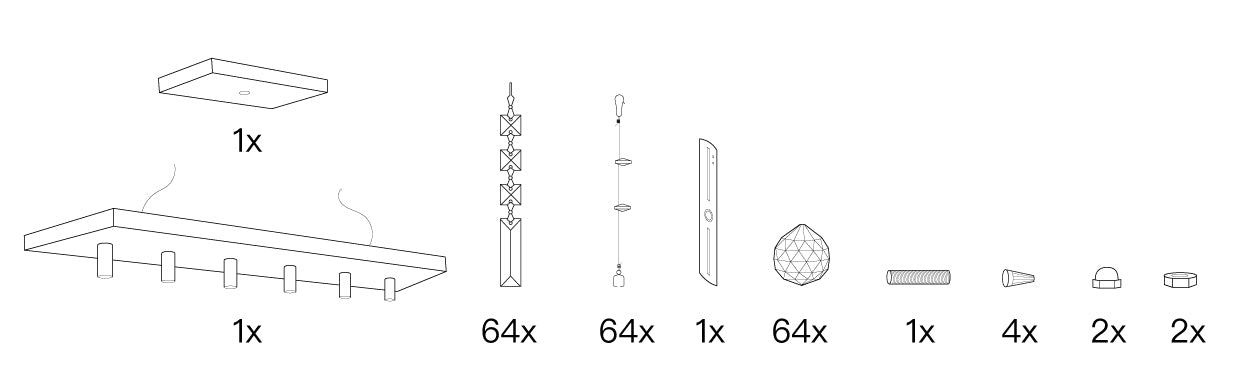
1. The tools you need
Ladder, pliers, wire strippers, screwdrivers, power drill(optional), a drill bit(optional)

Tips: If mounting to a support structure, you will also need the option tools.
2. Turn off the power
Turn off power at the circuit box to avoid possible electric shock.

Tips: To ensure safety, you can test with a measuring pen, or you can turn on the light switch to make sure the power is off.
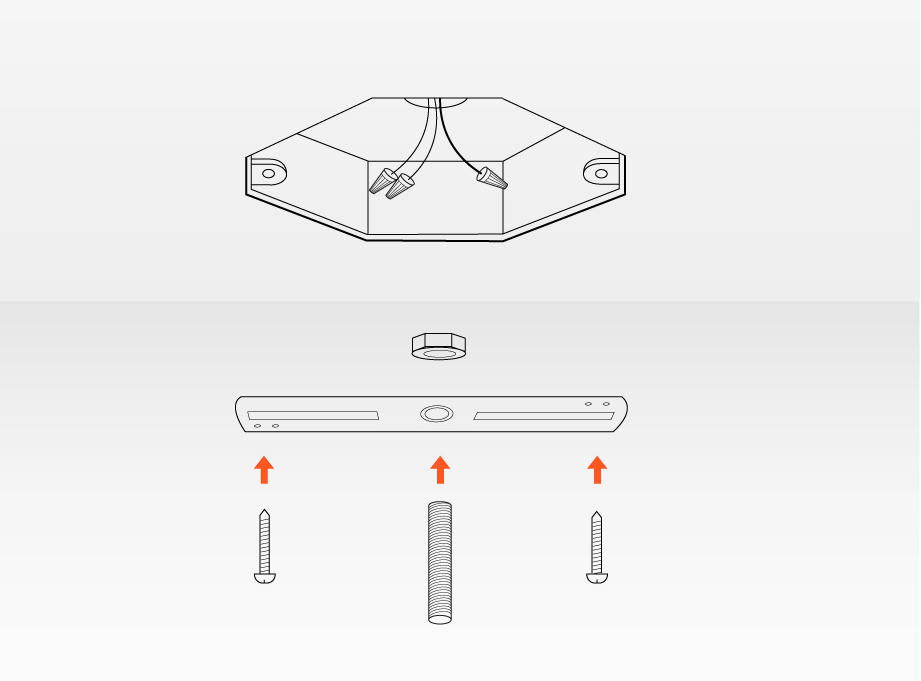
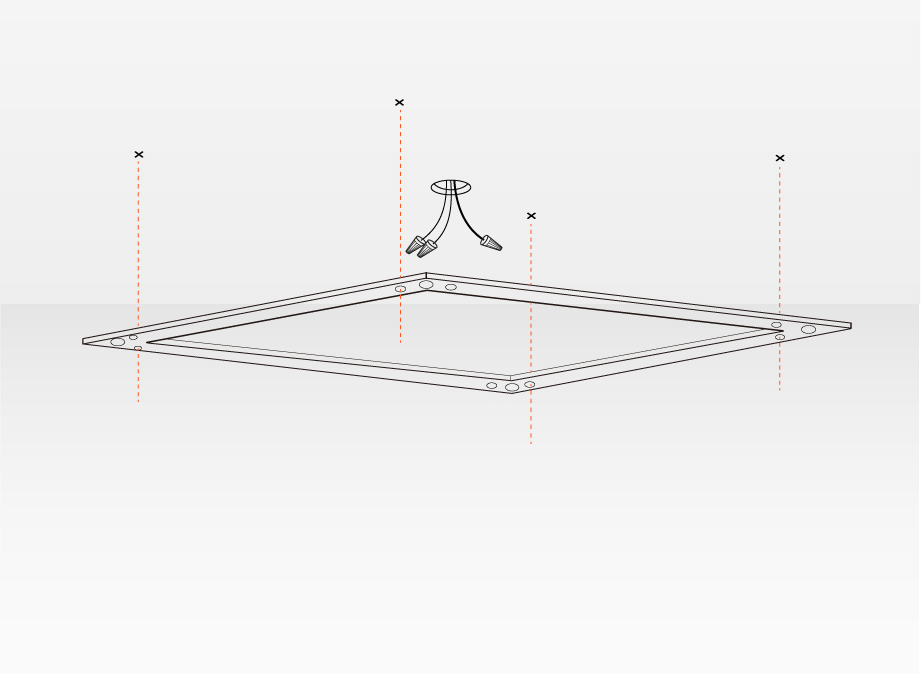
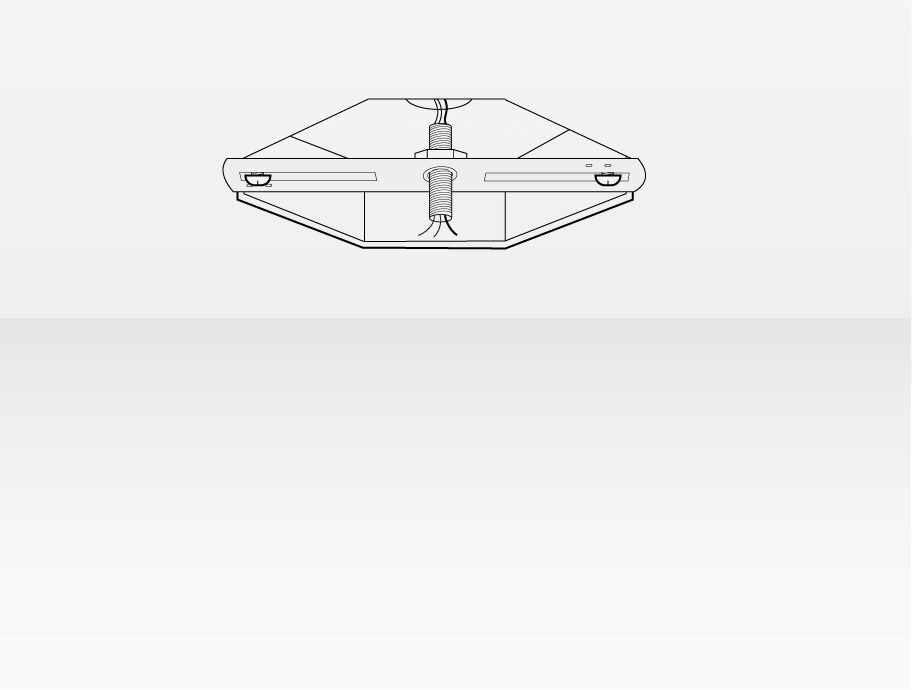
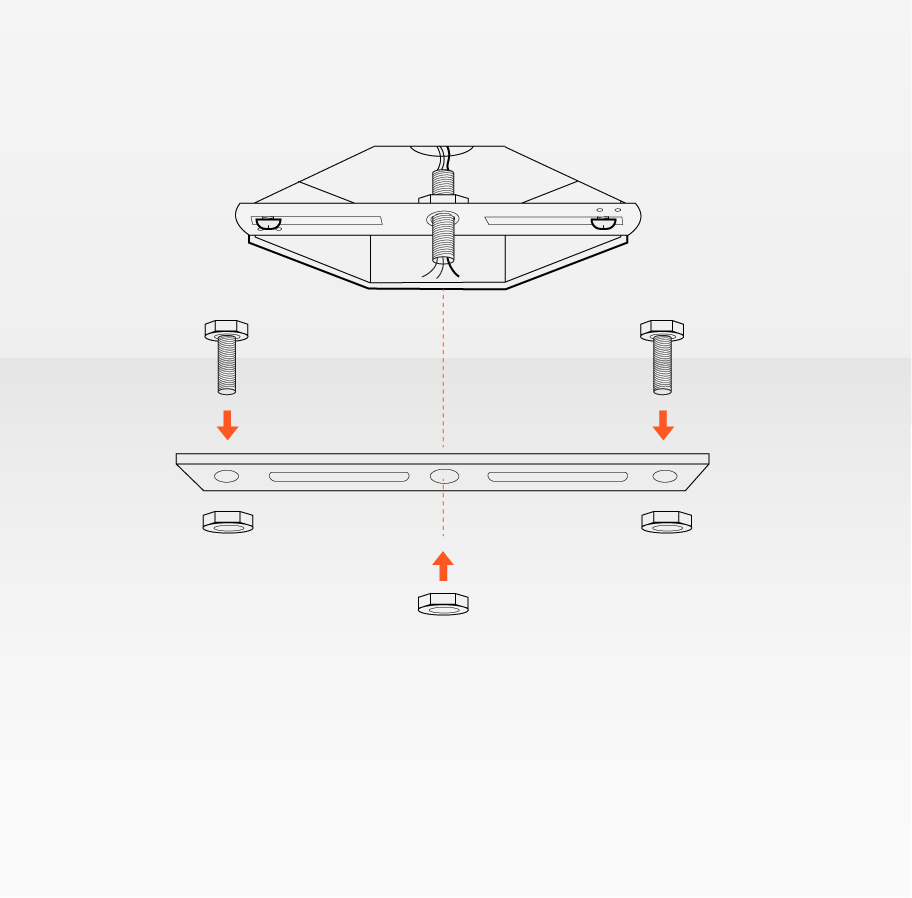
STEP 2: Install the mounting bracket
|
Pendant light: |
Ceiling light: |
 |
 |
|
① Attach the mounting bracket onto the outlet box with machine screws from the box. |
① Place the mounting bracket on the ceiling and mark out the points where you need to drill holes. |
|
|
|
 |
 |
|
② Done! |
② Insert the machine screws into the mounting bracket. |
|
|
|
 |
 |
|
③ Attach the chandelier bracket onto the mounting bracket with the threaded tube and hex nut provided. |
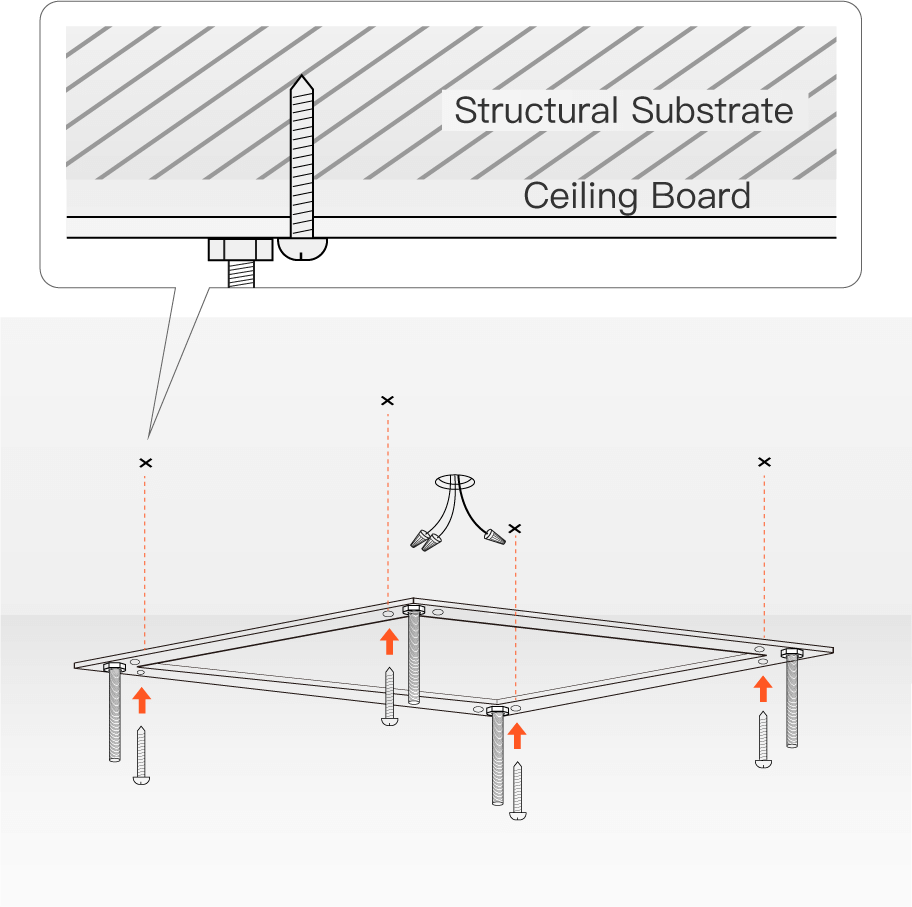
③ Attach the bracket to the structural substrate with screws. |
 |
 |
|
Completed! |
Completed! |
STEP 3: Determine the length of the chain (N/A to ceiling chandelier )
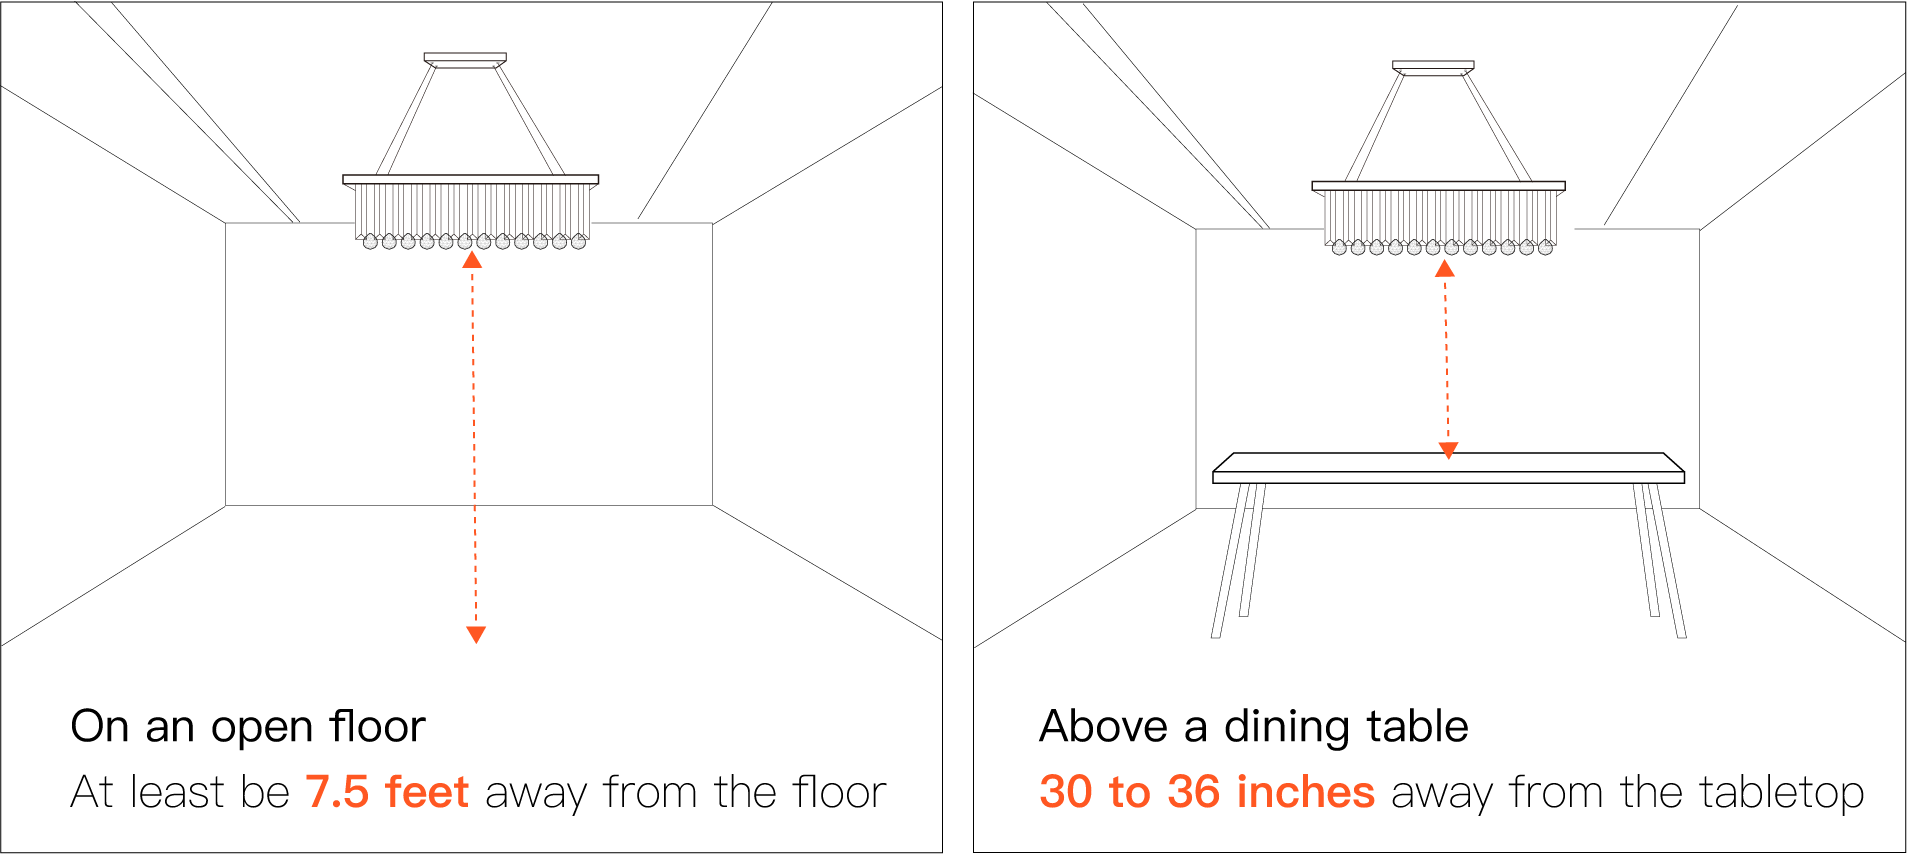
To ascertain the correct wire length to reach a certain height, you need to consider two variables: the chandelier’s height and the distance from its bottom to the surface beneath, whether it’s a floor or dining table. The chain length can be adjusted based on these factors to suit your requirements.
Guidelines:
1. When installing the chandelier on an open floor, it’s advised that the bottom of the chandelier be no less than 7.5 feet from the floor.
2. If the chandelier is being hung over a dining table, the distance from the bottom of the chandelier to the table surface should be between 30 to 36 inches.
3. When adjusting the hanging cords, the recommended minimum height, measured from the ceiling to the top of the frame, should be no less than 10 inches.
For additional information, refer to our chandelier sizing guide.
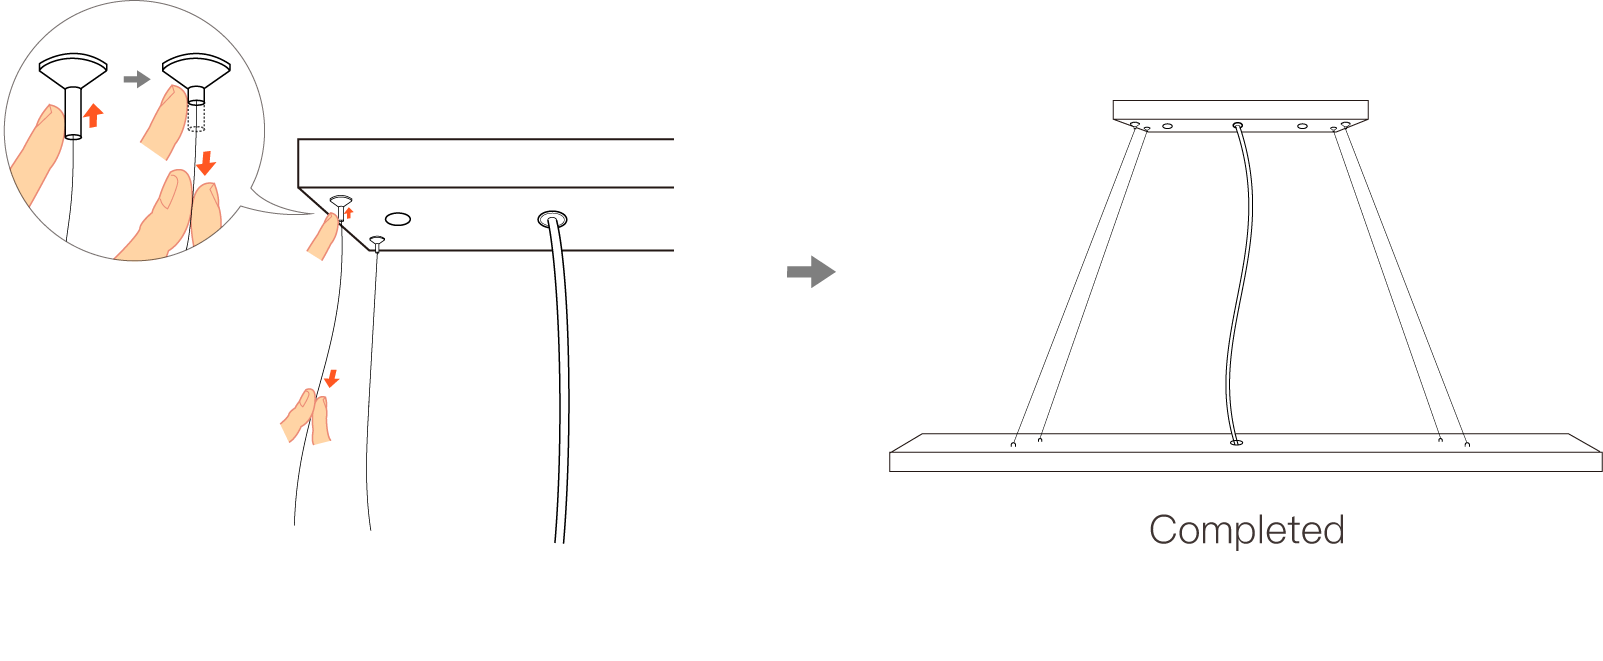
STEP 4: Adjust the length of the chain (N/A to ceiling chandelier )
PARAPHRASED TEXT:
Step 1: Push the pin upwards towards the canopy on the ceiling. This action will unlock the cable.
Step 2: Keep the pin in position, then either pull or push the cable. Do this for each cable to adjust the chandelier’s base up or down and ensure it is horizontally balanced.
Step 3: After setting the cable at the preferred height, let go of the pin. This will secure the cable in place.
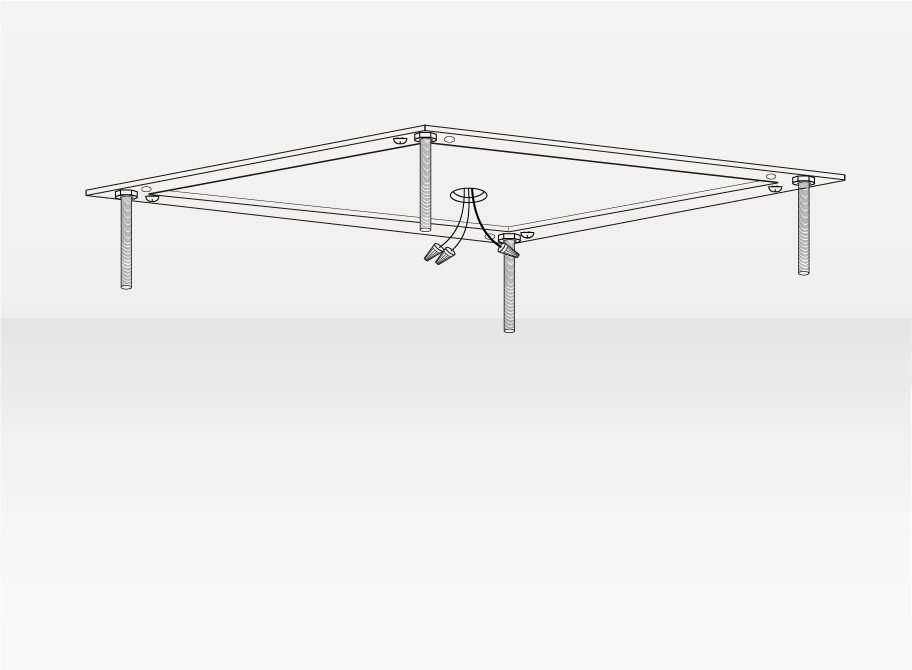
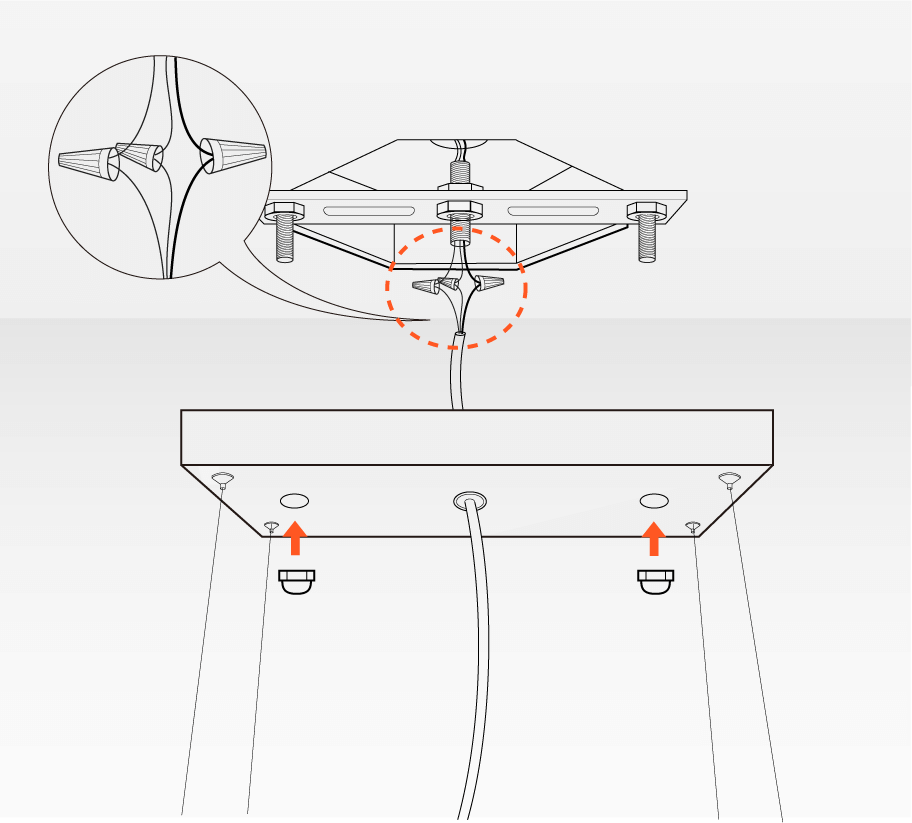
STEP 5: Connect wires and install the canopy.
The majority of chandeliers, particularly the modern chandeliers, come with black and white wires. Link the black or brown wire to the active wire, the white or blue to the neutral wire, and optionally, the yellow or green wires to the earth wire. Combine the bare tip of the black power cord with the exposed end of the chandelier’s black or brown wire and fasten them using a wire connector. Repeat the process for the white or blue wire and the white power cord.
|
Pendant light: |
Ceiling light: |
 |
 |
| ① Connect the wires based on the instruction above and attach the canopy to the mounting bracket with a bolt cap (provided). | ① Connect the wires based on the instruction above and attach the canopy to the mounting bracket with a bolt cap (provided). |
 |
 |
| Completed! | Completed! |
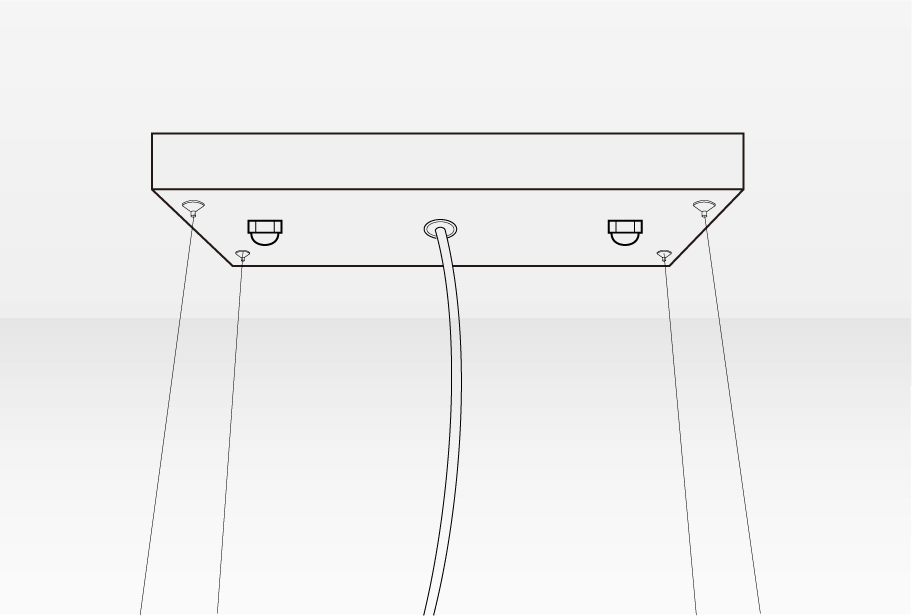
STEP 6: Remove the protective film
Remove the protective film on the canopy and chandelier base.
NOTE: This step must be done before installing crystal strings to the base.
|
Pendant light: |
Ceiling light: |
 |
 |
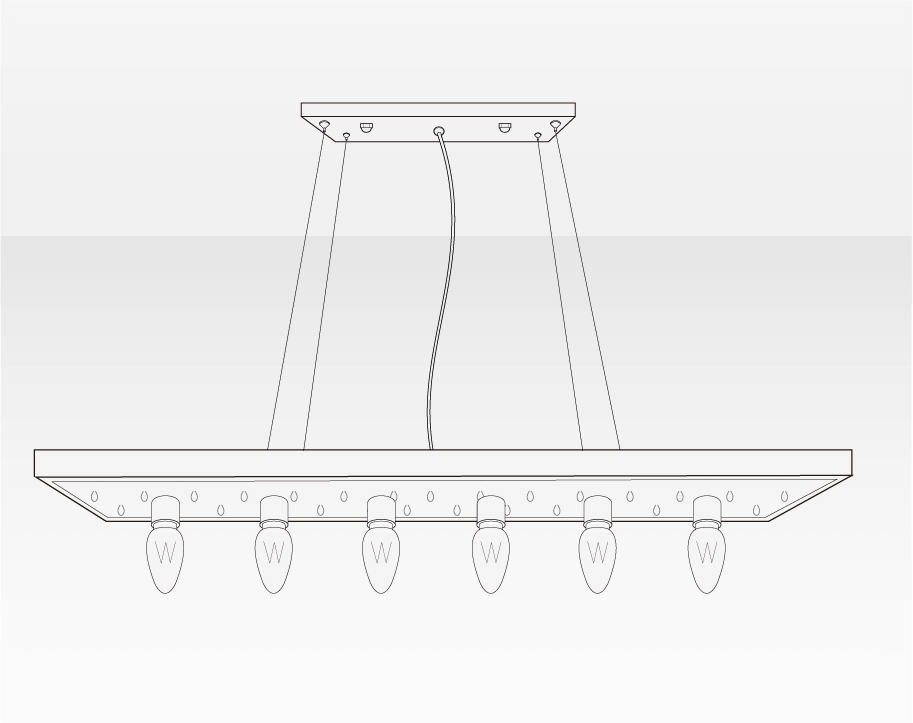
STEP 7: Install the bulb
Consult the light bulb data given for the product in the guide or on our webpage to choose the right kind of light bulb. The item will need a certain type of bulb, such as GU10. It’s up to you to opt for LED or halogen bulbs, depending on your liking. You also have the freedom to select the color temperature of the bulbs, for instance, daylight or warm white. Moreover, you have the option to select different hues for the bulbs, such as blue, yellow, or green. Don’t hesitate to look here for more insight on lights and light bulbs.
|
Pendant light: |
Ceiling light: |
 |
 |
STEP 8: Install the crystal
Affix the strands of crystals to the chandelier by pairing the designated numbers of the strand with the corresponding numbered hooks on the base of the chandelier, as per the guidelines provided in the instruction manual.
IMPORTANT: Verify the allocated number of crystal strands prior to installation. Ensure to drape the corresponding crystal strand onto the appropriate hooks based on the allocated number, and always arrange the crystal strands from the inside going outward to prevent any entanglement!
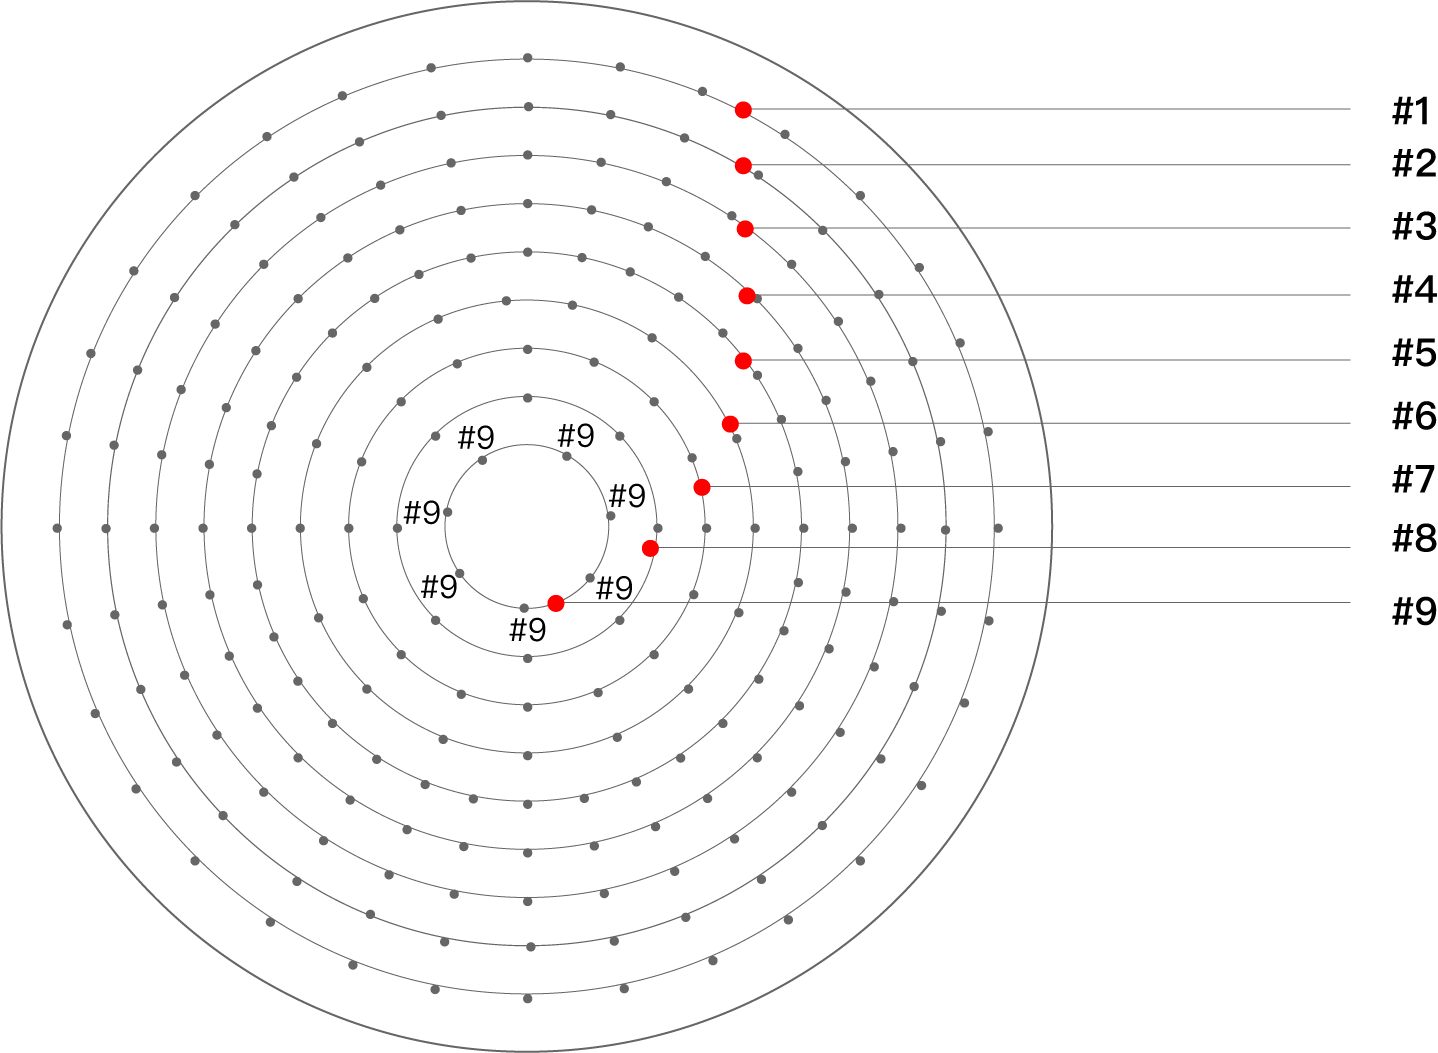
Plane Diagram

Crystal Strings Packaging Diagram
Below are installation instructions for Lewoer’s pendant-style crystal chandelier on how to hang the crystal strings.

An example of connecting the crystal ball to the end of a crystal string

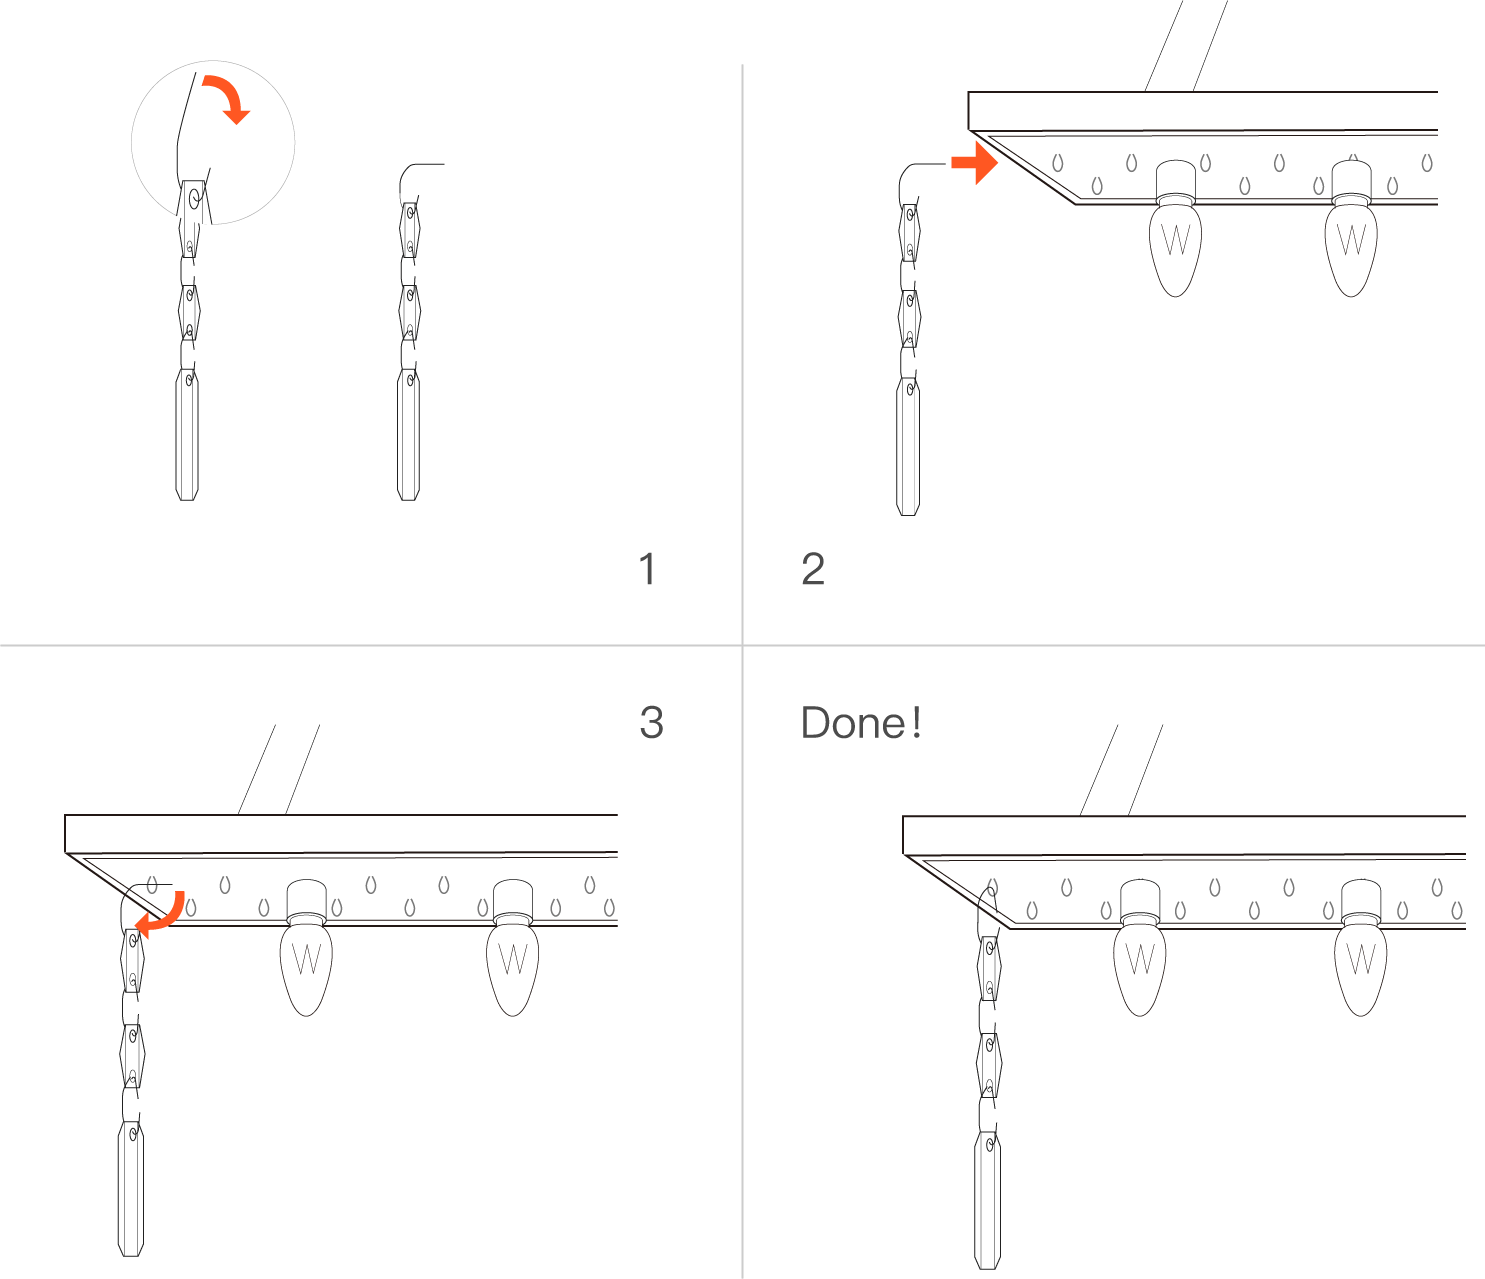
Below are installation instructions for Lewoer’s ceiling-style crystal chandelier on how to connect the crystal strings.

An example of hanging the crystal strings to the base of the chandelier
STEP 9: Check
Well done, you’ve successfully installed your chandelier! The final step is to evaluate it from afar to verify that the crystal chandelier is balanced and hung at the correct height. Make any minor tweaks if necessary. Once you’ve confirmed it’s safe, you’re free to switch on your home’s power and the light for the crystal chandelier. Now, sit back and appreciate the magnificent chandelier that you’ve just set up in your home.

Our aim with this blog is to give you a comprehensive understanding of the process of installing a chandelier, including detailed instructions for your own installation. Should you have any queries, don’t hesitate to reach out to us – we’re always ready to assist!
Further reading


How to Hang a Chandelier Ultimate Guide 101

Leave a comment
You must be logged in to post a comment.